I. About LiveTrekker™
1. What is LiveTrekker™?
LiveTrekker™ is an App and a website that allows you to record all your travels or your daily experiences in unparalleled detail... and for free!
With LiveTrekker™, you follow and record your movement with GPS on a map.
You can capture scenery of interest or events around you through pictures, videos, comments, or voice recordings as they happen, and geo-locate them on a map for an "all-in-one, map-driven, diary- or journal-like" experience. In this way you can precisely recall where and when things happened, and you can relive them anytime. Everything is stored on your device and sent in real-time to the Cloud when connected. Hence, you can share with friends your Trips in real time as you are living them, or share them later when they are finished.
LiveTrekker™ is about your life on the go. Waiting until end of the day to upload photos, recount places, conversations and locations loose the richness the trip, and often take a long time; LiveTrekker lets you keep track of your life, as it happens and wherever you are. It's about how you live your life, as much as it is describing it. People can share their experiences, places traveled, photos, recordings, written comments and videos with each other, giving an inside look at exactly how the trip happened in real time, rather than a blob of information at the end of the day.
All this is represented on a map, giving you the exact location where events unfolded, and is stored on the Cloud so your friends and family can see how you lived out your day, and how you continue to live it.
2. Is LiveTrekker™ really free?
Whether you are an occasional traveler or a seasoned globetrotter, LiveTrekker™ is free to download and use. You can access all the App's functionalities without restriction, whether it is for the capture, storage and protection of all your data on the Cloud, the re-living of your best trips or, of course, live sharing. This applies to personal and regular usage, within the limits of the Cloud's maximum bandwidth usage limit. Should you reach the generous resource consumption limit, we would notify you via email. For a commercial usage, please refer to the pricing page.
3. Does LiveTrekker™ work everywhere?
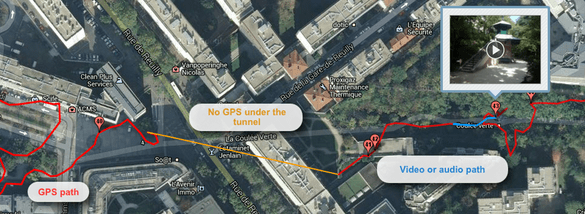
Yes, you can have a GPS signal everywhere and record amazing trips even in the middle of the sea, in a plane or at the top of the Himalayas! Sometime, you may have no GPS signal at all, or loose it temporarily, (for instance inside buildings or deep underground) any blogs you capture will simply not be geo-located. If a spike appears on the map, don't worry; you can just fine-tune it easily from your account.
See 4.1. how do I remove a blog or a GPS point? In Website section
4. Can I use LiveTrekker™ when I am abroad? How much will it cost?
LiveTrekker™ works everywhere, and as a travel app, it needs to also work abroad!
When you travel, you simply have to swipe your connection OFF (see 6.1.What does "Connected" On and Off mode mean?in App section) so that your phone won't get synced anymore with the Cloud. You can turn it ON once again when you have free Wi-Fi access to sync your data and share your trip. Beware; live-sharing will not be available when your connection is turned OFF
To be sure, you can disable the data roaming option from your device settings. Your Trip will still be recorded normally; the only difference is that you will not be able see the map (it needs to be loaded from Internet with an active connection).
Tips: In certain countries, buying a local SIM card is not expensive and will allow you to share your trip in real-time using a data connection!
5. What is the difference between the LiveTrekker™ application for iPhone, and the LiveTrekker™ website?
With the App, you can record your GPS path and capture any scenery of interest or events around you through pictures, videos, comments or audio recording. Everything is stored on your device and is synchronized with our Cloud in real-time, so that your friends are able to follow you live if you have shared your trip with them. When you are abroad, the disconnected mode prevents data roaming charges by cutting the sync with The Cloud, which normally requires an Internet connection.
On the website, you can relive all your trips on beautiful maps, edit or fine-tune them and share it all with an amazing level of detail.
The main difference is that you can't record a trip from the website because a LiveTrekking is about a place you have been at a precise location and period of time.
6. What device can I use to record a trip?
LiveTrekker™ is available on iOS starting from iPhone 3GS, you can also use your iPod Touch if you use an external GPS device.
LiveTrekker™ is also available on Android, but it is still in a beta version. Our development team is working hard to make it work on all Android devices soon :-)
Tips: If you have a pro camera, keep it with you! You will be able to import all your amazing shots through our website and add them to you trips thanks to our blog addition feature.
7. What is a LiveTrekking? And what is a Blog?
A LiveTrekking is the result of what you have recorded with LiveTrekker™. Simply put, it is a map on which a red line displays the path you have traveled and various pins display all the "blogs" you captured, i.e. all the photos, videos audio or text comments or any combination of those elements.
8. What about my privacy?
LiveTrekker™ team commits to never use your data, to monetize it to third parties for example, without your specific authorization. Your data belongs to you and you can recover everything on your computer anytime with simple click via our Excel's export feature on our website.
See 3.6. What is the Excel icon? in the Website section
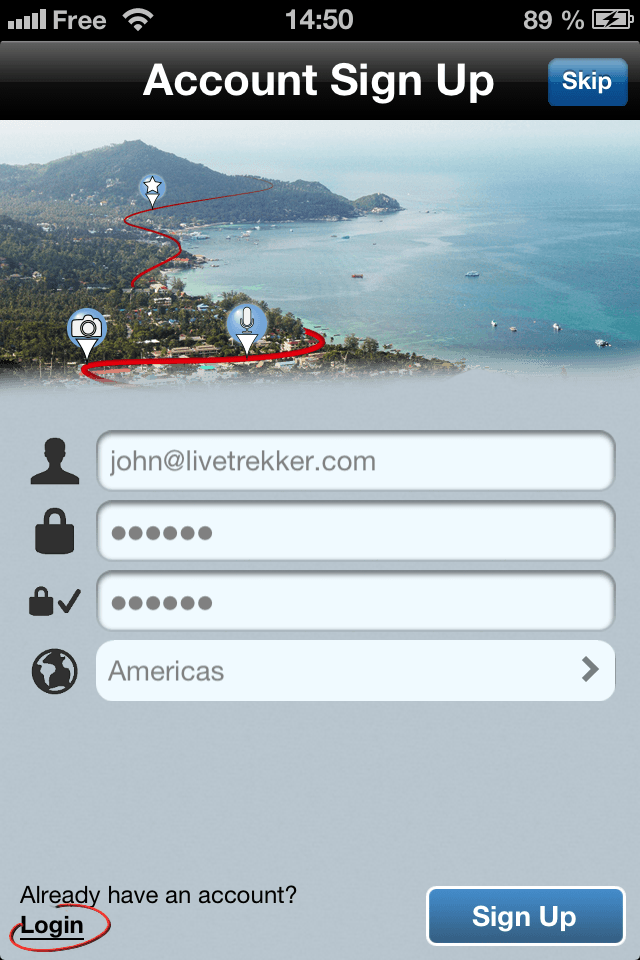
9. Why do I need to create an account? Which region should I select?
To use LiveTrekker™, you need to create an account to get your data sync to The Cloud. When you create it, we ask you to define your region because we own several servers around the world in order to improve synchronized data.
Once you have chosen a region, you cannot modify it. As an advice, always select the region of your place of residence. When you travel abroad, it will take a little bit more time to sync from your device to your account but back to home, you'll have a better experience to relive your memories. It is of course faster to view them also for your friends and family who are around you back home.
Your region is selected by default, based on where you are when creating an account.
10. Why do I need to update the application?
In order to provide you the best user experience we are continually improving LiveTrekker™ by adding new features or improving existing ones. To take advantage of all those new features, don't forget to regularly update LiveTrekker™!
II. The App
1. General
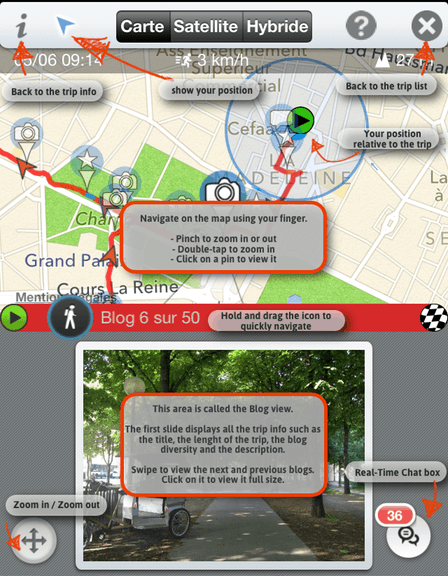
1.1. How does LiveTrekker™ app work?
Using LiveTrekker™ app is really easy and does not require much effort. You only need a little learning to benefit from the power of LiveTrekker™.
When you arrive on the tracker view, simply press "Start" to create a trip. When you want to capture an element of interest, select the desired icon in the blog tray, add a new blog if you want and save it. That's all!
![]()
Share your trip while you are recording it to do a Real-Time Trip using the “Share” button on the tracker screen, or wait your trip is finished to share it from the trip tab.
1.2. Why do I need to create an account to record a trip?
LiveTrekker™ isn't only an app, it is also a website where your trips are available with a lot more detailed information. Nonetheless, you need to sync your data through The Cloud to benefit of the entire LiveTrekker™ experience and by setting up an account you can access your synced data on your mobile and online at our website.
Don't worry, we commit to never use or monetize your data without your permission.
1.3. I have already created an account. Can I re-use it?
Sure you can! The account you created before is linked with the one required on your device. You can also use your account on several devices. The only limitation is that you cannot record a trip using two devices at the same time.
1.4. I have lost my password. What can I do?
On the App, you do not need to enter your password again when you switch the connection mode from OFF to ON. Although, if you need to enter it again for any reason, you can go to livetrekker.com, even from your devices internet browser, and request to reset your password.
See 1.3. I have lost my password. in Website section
1.5. Can I use LiveTrekker™ on several devices?
You can use the same account on different devices, but you can't acquire data from both devices at the same time, otherwise strange things might have happened once you access your account again online!
NOTE: Your trips will always be available on the website, but your trips taken with one device won't be available on a secondary device using LiveTrekker™
1.6. What happens if I have no Internet connection, or if I am abroad?
If you have no Internet connection LiveTrekker™ will still work! As a side note: you don't need any Internet access to use your smartphones GPS!
Therefore, you can continue to record blogs and trips and upload them all later on once you find a connection. You may notice that the map component will not refresh but your Blogs and Trips will be stored on your device to be synchronized later on.
When abroad, think about using disconnected mode so that you prevent your phone from synchronizing your data and LiveTrekker™ from attempting to access the Internet.
Tips: Don't forget to create your account before travelling overseas. You will need to create one to record your first trip, even if you use disconnected mode.
1.7. What if I have no GPS signal?
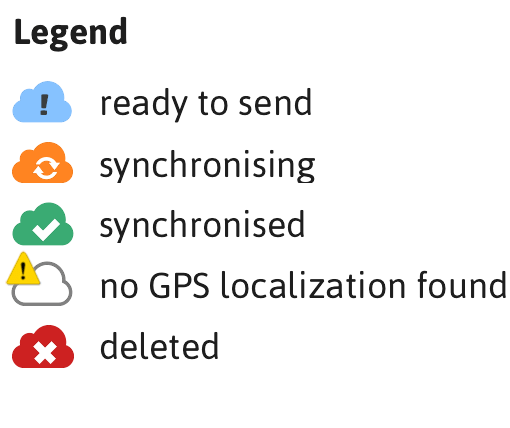
If you have no GPS signal, for instance inside buildings or underground, any blogs you create will not be geo-located. They are still recorded and so can be synchronized when you are connected to the Internet. They will not be shown or located on the map though and will only appear with other geo-located blogs on the site in the time sequence order in which they were taken when trips are viewed. Blogs with no GPS coordinates will be shown next to an empty cloud icon with an exclamation mark.
1.8. Is using the App, will impact my phone battery life? How do I extend its battery life?
Using your smartphones GPS will always drain battery. A regular usage of LiveTrekker™ gives you at least 6 hours trip-recording time.
here are helpful tips to extend your battery life:
- Stop your trip if you know you won't be moving for a long period of time (at lunch for instance). Once you want to continue, start a new trip from where you stopped. Once back on the LiveTrekker™ website you will be able to merge these trips very easily. (See 5.1. What is "Browse" tab? in the Website section)
- In the app settings you can increase "Cloud Transmission Frequency" to reduce the connection between your phone and The Cloud. Beware that your trip will be refreshed less often if you are sharing live. You can also use disconnected mode if you will not be sharing your trip at all in real-time. Your phone will not send data to The Cloud anymore and you will therefore preserve your battery life.
- An external battery is a good solution for those who want to record long periods of time. Many of them are not expensive and readily available.
1.9. Do I need to stay on the app while I'm recording a trip? What happens if someone calls me?
You do not need to stay on LiveTrekker™ all the time when you record a trip. The app runs in the background and will record your travel automatically. All you need to do is to click on the icon when you want to capture a blog.
In addition, a reminder notification will inform you that you are acquiring data so that you don't' forget to turn it off when you have finished your trip.
1.10. The application crashed. What do I do?
LiveTrekker™ is still in beta on Android, so a crash sometimes occurs even though we are using all our efforts to make it as stable as possible for everyone!
If it does happen, simply close LiveTrekker™ and relaunch it to re-start a trip. You will be able to merge the separate trips later on our website.
When you restart LiveTrekker™, you will receive a notification to send a generated crash report. Please consider sending this to us as it helps us to improve the App and ultimately make it better for you :-)
If you have an issue that regularly appears, you can also send us an email at support@livetrekker.com. We will do everything we can to help you resolve the issue as soon as possible!
2. Discover™
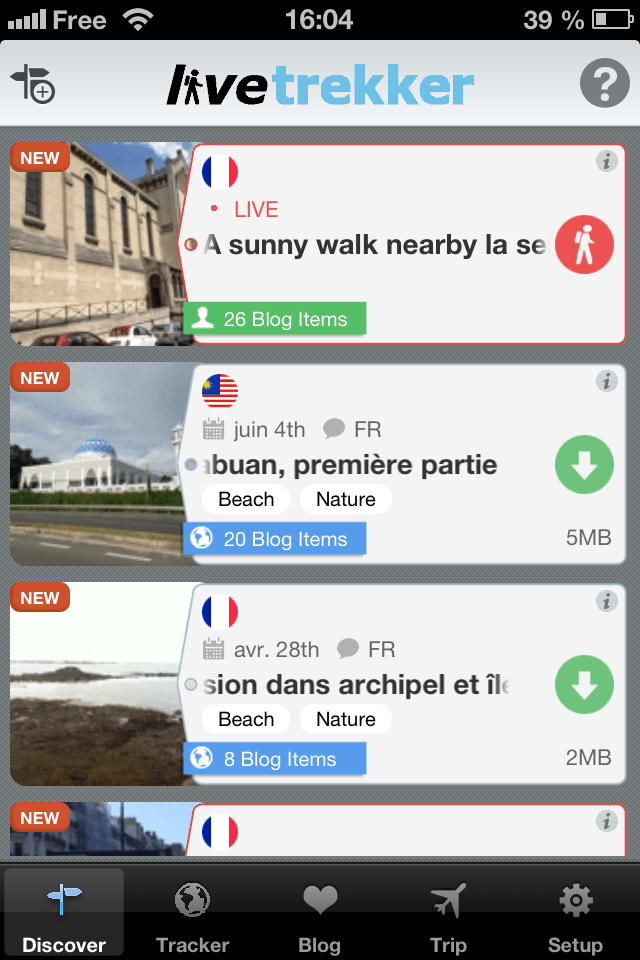
2.1. What is Discover™? Where do the trips come from?
Discover™ is a selection of featured trips, made all around the world, by users or companies that have chosen to share their trips with the LiveTrekker™ community.
These trips have been submitted to the LiveTrekker™ team before being published.
You can also find here the trips that have been shared with you from your friends, your colleagues or your family for example.
Use the list to parse the trips by chronological order or access the map to find a trip in a specific area.
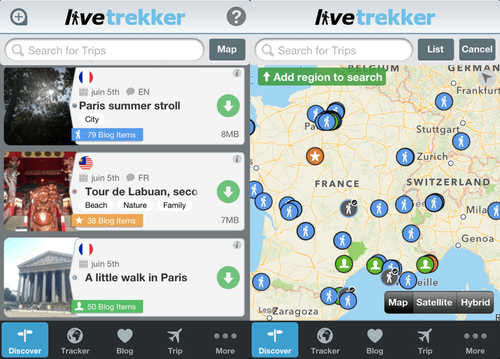
Note: the orange color indicates Sponsored trips, the blue color is for trips submitted by the community, and the green color indicates trips that have been shared with you.
2.2. How does Discover™ work?
Everyday, new trips will be delivered to your Discover™ tab and added to the top of the list. The menu lets you add more trips to your List, enter the Search interface or delete all trips from your list.
Additionally you can, at anytime, add more trips manually by simply taping on the Discover™ menu icon on the top left of the application. Here you are able to manage your criteria and ask to "Add more trips" based on your selection.
Note: you can also pull the list to add more trips
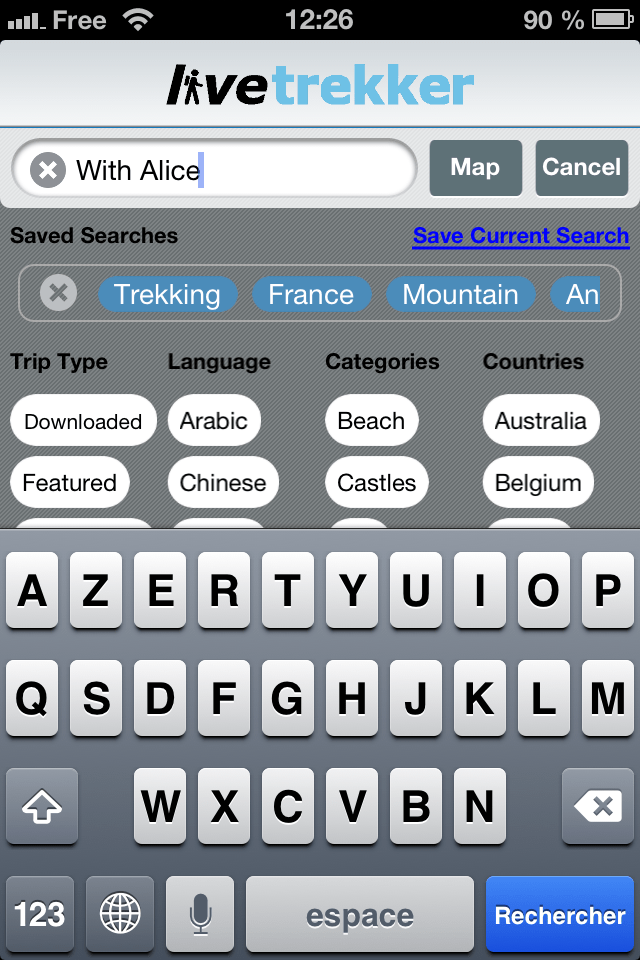
2.3. How does Search work?
To browse the all catalogue of trips, you can tap a keyword, filter by type, category, language, or countries.
Add as many criteria as you wish and save your favorite searches.
Press "Map" to view the search results directly on the map, the "Search" button on your keyboard (bottom right) will display them on the list . Note that you can easily switch the view at any time.
2.4. How can I view a trip?
Before viewing a trip, you will need to download it.
To do this, click on the trip that interests you to view more detailed information about it such as a description of the trip and the amount of different blogs it has. On the info panel, you can then download the trip by tapping the green Download button below the trip information. You can also download a trip directly from the Discover™ list by taping on the green arrow to the side of each trip.
While downloading, your trip will indicate an overlaid progress bar in green and show you the percentage downloaded next to the Pause Download button on the right side of the trip item.
Once downloaded, click on the blue arrow to access the trip
![]()
Note: use "Find my Position" to geolocalize yourself relative to a trip. This very cool feature lets you follow the path of any Discover or Shared trip to experiment it yourself.
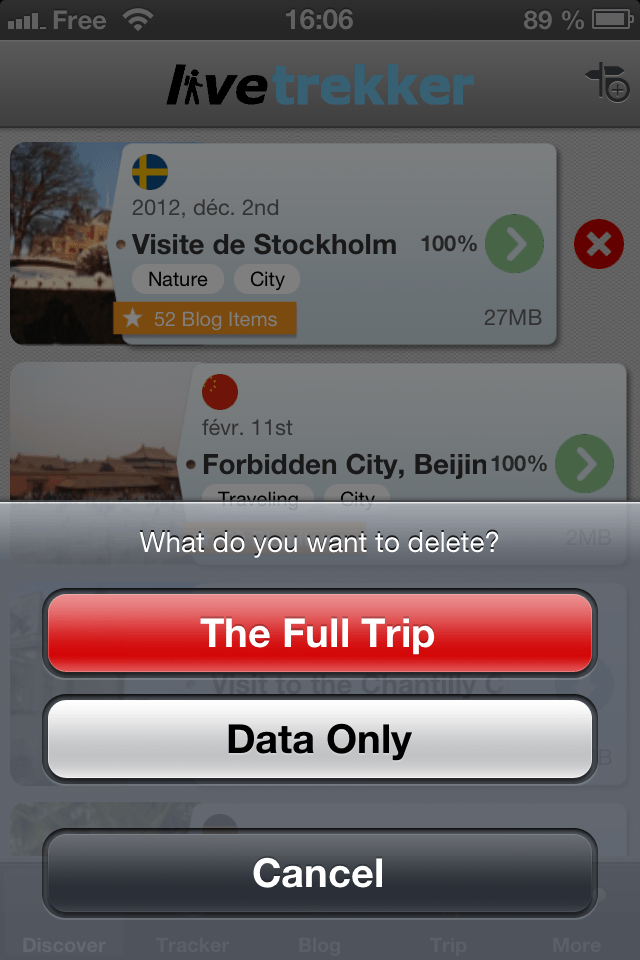
2.5. How can I delete a trip?
To remove a trip from your Discover™ screen, swipe it from right to left and tap the red cross icon to delete the trip
You will be presented with two options:
- "The full Trip" to remove the trip completely from the Discover™ list, including the downloaded data
- "Data Only" if you just want to erase the data and view the trip again later
2.6. How often do new trips appear?
Everyday, you will be offered two new trips but a lot more are available through the "Add New Trips" drop-down on the top left of the screen.
2.7. Will my trips appear here and be available for all users?
No, trips that are displayed on the Discover™ screen are only those which have been submitted by their owner.
LiveTrekker™ commits to not use or monetize user's data without authorization, so don't worry, nothing that belongs to you will be shared without your specific request.
2.8. How do I submit my trip?
Feel like sharing your trip with the LiveTrekker™ community? If you think your trip is worth sharing with the community, you can submit it to us directly from the App or from your account on the website. We'll review it and if it's really great, we might publish it!
Selected trips should have a content value of interest to others, contain at least 10 blogs, non-interrupted GPS path, and of course, only contain appropriate content.
Do you want to advertise through Discover™ LiveTrekkings? Please, contact us at business@livetrekker.com
3. Tracker view
3.1. How do I start recording my location?
You start recording your location by pressing the Start button, which is situated in the Tracker tab, close to the top of the screen on the left hand side. Upon stopping it, you will be prompted with an option to name the Trip, edit timings, and then finally to save it.
Tips: Press and hold the start button for two seconds to start and save the trip right away. Particularly useful to start a trip in live-sharing mode!
3.2 What is a blog?
A blog is a log of a current event, scenery, point of interest etc. that is saved and stored in a media rich format. LiveTrekker™ blogs allow you to record events in four different ways: photo, video, audio, and text.
You can also use any combination of those elements to create a richer multiple media blog that more accurately represents you true experience (for instance a blog made up of text + audio, or another one made up of picture + video + text etc.). We call it a multiple blog.
3.3 How do I record a blog?
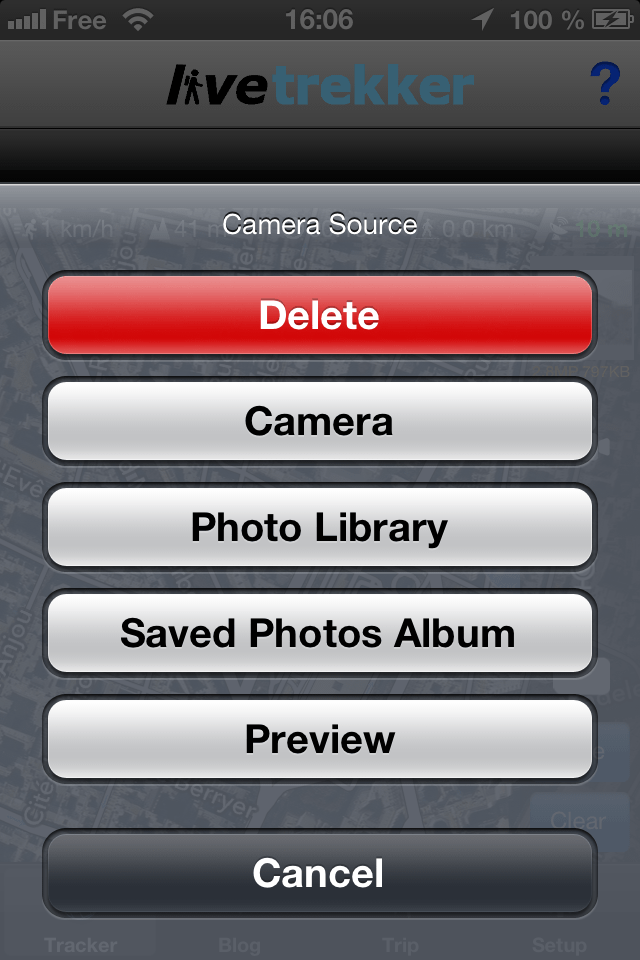
To add blogs on your trip, you just need to select the appropriate icon on the blog tray (by default on the right side of the tracker tab). Then, simply capture your blog similar to how you would normally capture a picture or video on your smartphone. You will be asked to confirm if you want to use the captured media or you may wish to try again. Once you are satisfied, your new blog will appear as a thumbnail on a new screen.
A new screen will appear. Either you save your first media straight away and create a single blog or you add some more media and create a multiple blog.
Once you have saved your blog, a corresponding pinpoint appears on the map.
Icons on the tray and pin on the map consist of the following:
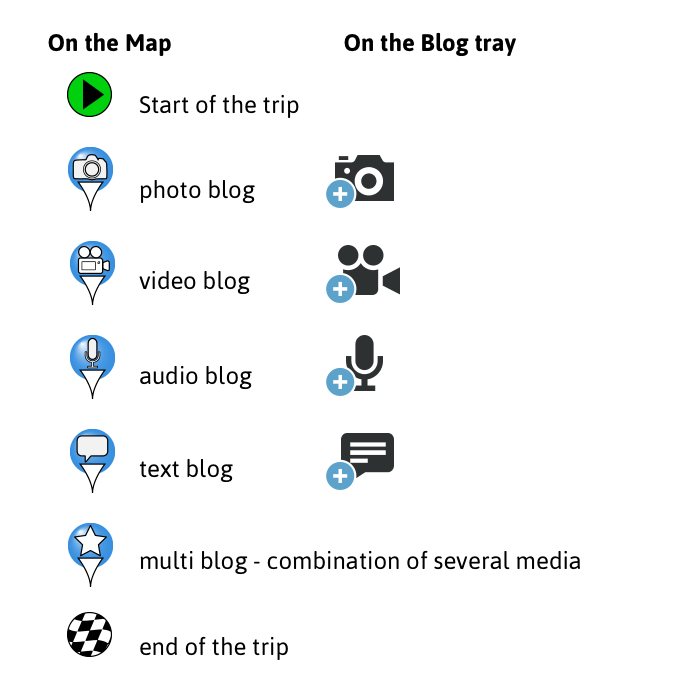
Tips: On the map, you'll find a fifth pinpoint representing a star. This means you have a blog with multiple media items at this point.
3.4. What is a multiple blog and how do I record them?
A multiple blog is a combination of several media items captured at the same location, i.e. under the same entry. Therefore, on the map, you will have several media on the same pin.
To record a multi-blog, once you have captured one type of media (picture, video, etc.) and before you "Save", simply click on one of the three other blog icons to add another type of media. You can then save all these media as a single container by pressing on "Save".
Note: You cannot record more than one media of each of the four types (photo, video, audio comment, text comment). :
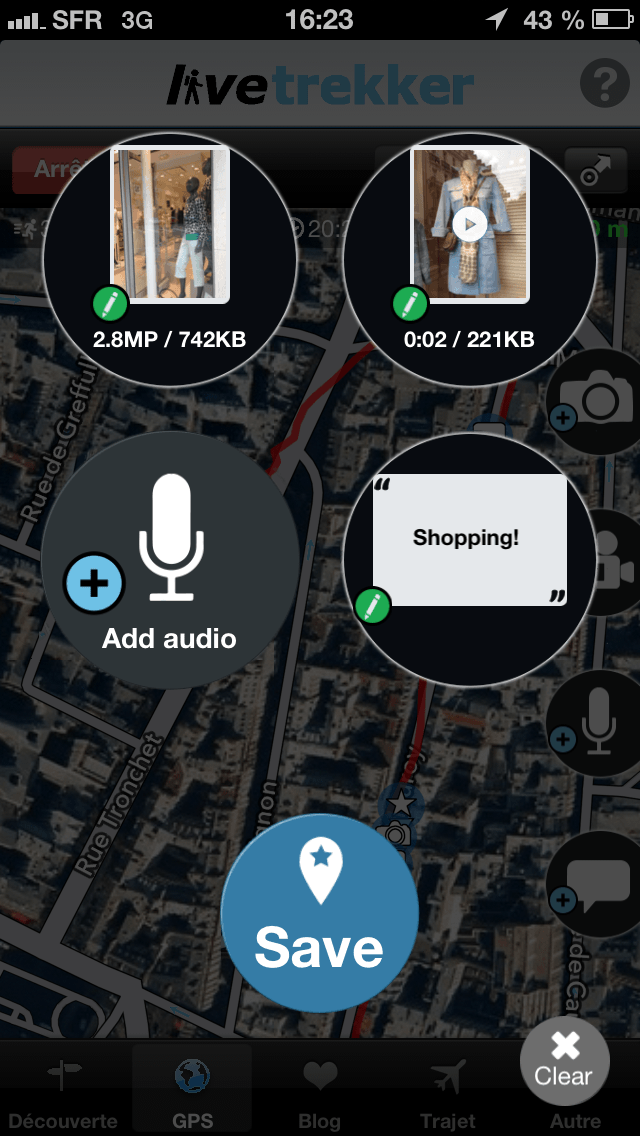
3.5. Tell me more about all the buttons and info displayed on the tracker screen
LiveTrekker™ has many features to aid you in capturing and LiveTrekking more enjoyably!
![]()
3.6. I'm left-handed, I would like to have the blog tray on the other side. Is it possible?
Sure thing! Go to Setup tab and under the Ergonomy section turn "Right-handed" off. Your tray will be switched to the left hand side which should make blog selection easier using your thumb.
3.7. Where does a blog pin appear on the map? Where it has been recorded or where it has been saved? What about a multiple blog?
A picture or a video blog are always displayed at their exact location, i.e. where they have been recorded:
- If the blog tray has only one media item, then the blog coordinate is the one where the media has been taken. This also applies to the comment blog.
- If the blog tray has one media item of any type and a comment, then the comment GPS location is not used and is combined with the GPS location of the other media
- For a video or an audio recording, the GPS position is that of the end of the recording
- If the blog tray has multiple types of media items, then the video and picture recording coordinates prime, in that order.
3.8. How do I view a blog I have just taken?
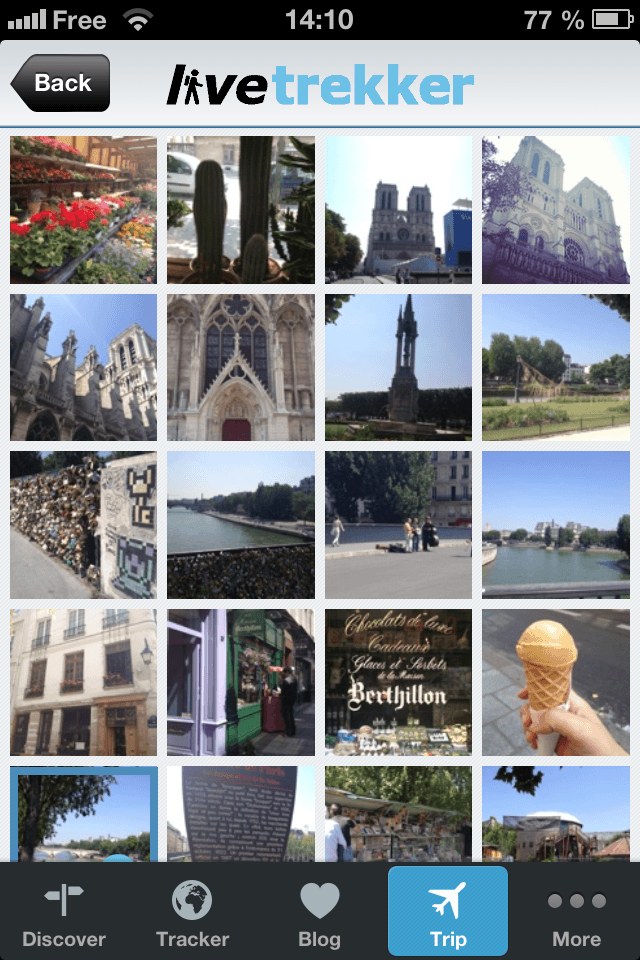
The easiest way is to tap on the pin that appears on the map and your blog will be displayed. You can also swipe left or right to navigate through all the blogs you have recorded and it will show you them in the order they were taken during your trip.
Another solution is to go on the Trip tab, select a trip and click on "Parse Blogs". All the Blogs will be displayed there in chronological order.
3.9. Why do I have a red dotted line?
This indicates that you lost GPS signal during this time in making your LiveTrekking. The yellow line is the connection between the two last valid GPS points.
3.10. Why do I need to press save to record a blog?
Pressing save to record a blog is an additional step but allows you to add other media and create combination multiple blogs. It allows you to tailor your blogs with a combination of rich media and place it on your red trip line only when you are ready.
See 3.4. What is a multiple blog and how do I record them?
3.11. What happens if I press delete on the blog tray?
By pressing delete you will clear all the current media items attached to the tray.
If you would like to erase only one item from the tray, tap on the item and select "delete" from the menu that will appear. This action will apply only to the selected media.
Tips: With this menu, you can also edit a particular media item from the blog tray.
3.12. Can I edit or modify my blogs? What about multiple blogs?
Yes, you can edit a Blog before you press on the "Save" button. Once saved, a Blog can be deleted either before or after transmission, but can be not edited from the App.
If you have already saved the blog, you can only edit it through the website, once your trip has been synchronized.
See 4.2. How do I edit a blog? on the website section
To delete or edit a media on a multiple blog (before saving it), just tap on it in the blog tray and select the appropriate option from the menu that appears.
Tips: If you tap on the photo icon, you will be able to import a picture from your library. It could be useful to import a photo on which you applied a filter for instance. You can also access this feature by tapping and holding on the icon in the blog tray for at least 2 seconds.
3.13. How do I know if my blog has been uploaded to my account and is available to view on the website?
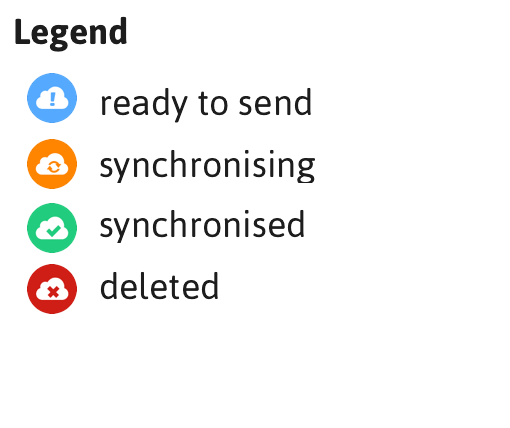
Go to Trip tab and access the blog list of the desired trip by tapping on it and selecting the Blog list icon on the Actions menu. Here you will be able to see from the various Cloud icons the status of your blogs.
See below a quick guide to the different icons and what they mean:
3.14. Do I need to leave the app open to sync my blogs?
When you share a trip in Real-Time, Blogs will sync with the Cloud even if LiveTrekker runs in the background. Otherwise, you need to leave the app running in the foreground until all Blogs are synced using an Internet access. Don't worry, it shouldn't take long! :-)
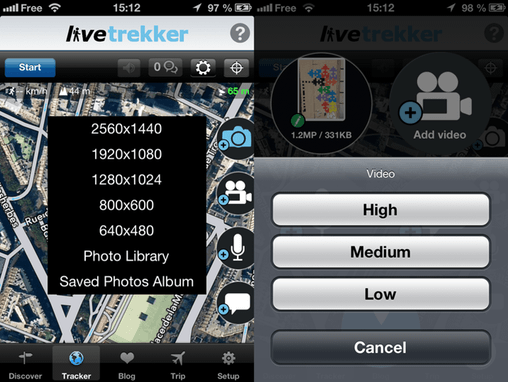
3.15. How do I change the blog capture resolution?
To set up a specific resolution by default, go to the Setup tab and under the Blogs section you will be able to define a resolution for each type of media.
You can also change it temporarily on the Tracker view by pressing and holding down the icon of the blog type you would like to capture and selecting a resolution. It will only record at this resolution for the next capture.
3.16. What happens when my blogs are deleted? Can I restore them?
Your blogs are kept on your device for a certain period of time before they are automatically deleted, however they are not deleted from your account on the Cloud so they are always available to view on the website. You can change the amount of time blogs stay on your device by navigating to the Setup tab and selecting a different time period in Blog History.
If you delete a blog on purpose from your device, it will be completely deleted on your account. To do so, when you are on your Blog List, swipe your finger on the blog you want to erase from right to left and click on "Delete". Once synchronized with the Cloud, this blog will be erased from your trip.
4. Blog
This view allows you to check the blog sync with The Cloud. Go to 3.14 to get more details on Cloud synchronization.
5. Trip list
5.1. What is a trip?
A trip represents the movements you make, and the blogs you take, for a period of time you define. It could be share directly from your device... and even in real-time!
5.2. How do I create a new trip?
You can create a new trip by clicking on "Start" from the Tracker view to start to record your track, and add your blog on the road. You can also capture a blog, which, once saved, will automatically start a new trip.
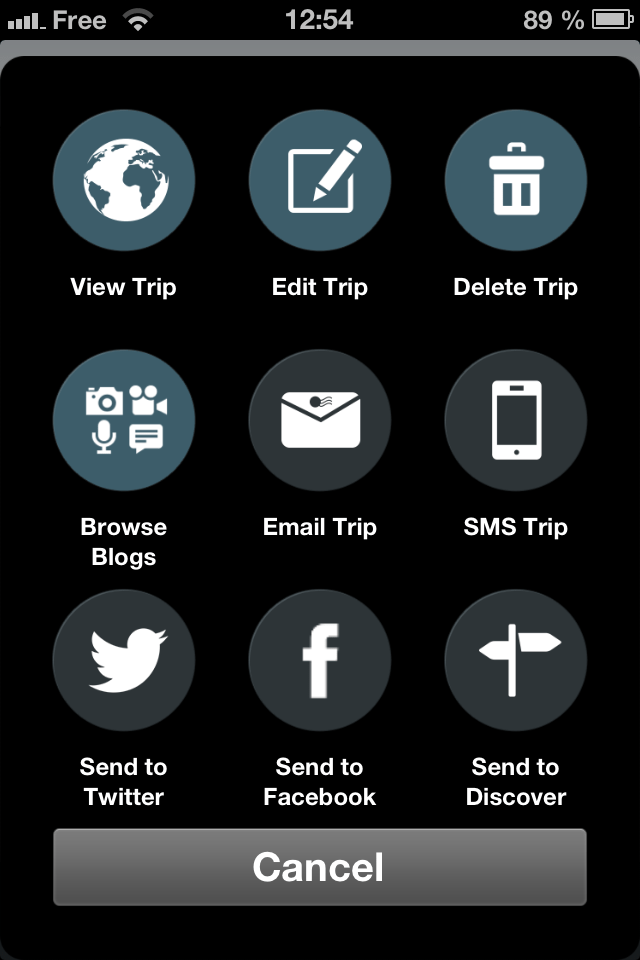
5.3. How do I share a trip from my device?
Go to the Trip tab and select the trip you want to share by tapping on it. You have the ability to choose to share your trip through SMS, email, Facebook or Twitter. Write a personal message and just share. It's simple :-)
Don't forget to save any changes you make, or want to make, to your trip before sharing.
People receiving the link can see your trip from their computer or from their mobile if they have the application. In this case, the trip is added to the Discover™ tab, with a green highlight to differenciate from it from public trips.
5.4. How do I view a saved trip?
Select a trip, and tap on the icon top left "View Trip" on the Actions overlay. You can also access it with more amazing level of detail on your account at www.livetrekker.com once synchronized.
5.5. My trip failed to save or disappeared. How do I recover it?
Your trip name is simply a container for your blogs and GPS points. If your trip disappears, you delete it, or you fail to save for whatever reason you can simply create a new trip via the trip tab (see 5.2 How I create a trip? above) and enter the start date and end date of your missing trip (if you can remember!). This will create a new trip that collects all your GPS points and blogs you created during that time.
From your account on LiveTrekker.com, take a look at "Browse" on the header menu to re-create, duplicate or modify any of your trips!
See5.1. What is the "Browse" section? How does it work? in the website section.
5.6. How do I edit my trip?
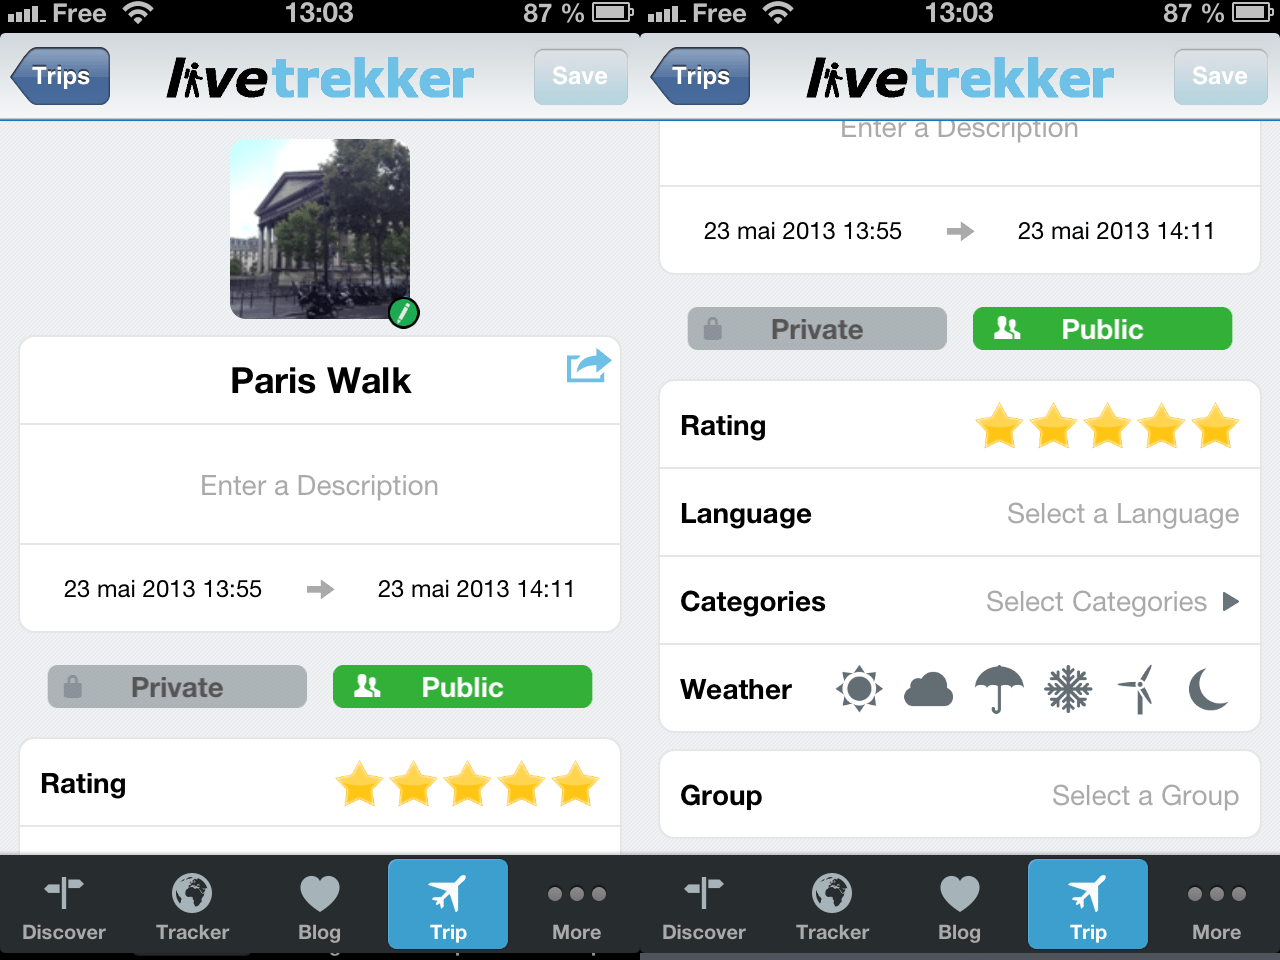
You can edit a lot of information right from your device, such as: the name and description of a trip, its duration (by changing the start and end dates), the categories it belongs to, the weather observed while recording, the group it's part of and rate it.
To do so, select a trip from Trip tab and click on the "edit trip" button from the Actions overlay. Then, select the item you want to modify.
Tips: There is much more you can do to your trip from your account on the website. Take a look at III. 4. Fine-tune a trip, to learn more.
5.7. What do the colored Cloud icons mean?
The following icons inform you on the synchronization status of your trip. They are also used for each blog in the Blog lists of your Trips.
5.8. How can I set/change my cover picture?
To set a cover picture from your phone, access your trip list on the trip tab, tap on a trip and select "Edit Trip" to enter the edition menu. Tap on your current cover picture to display all the pictures of that trip. Pick your favorite one to set it as the new cover picture.
6. Setup
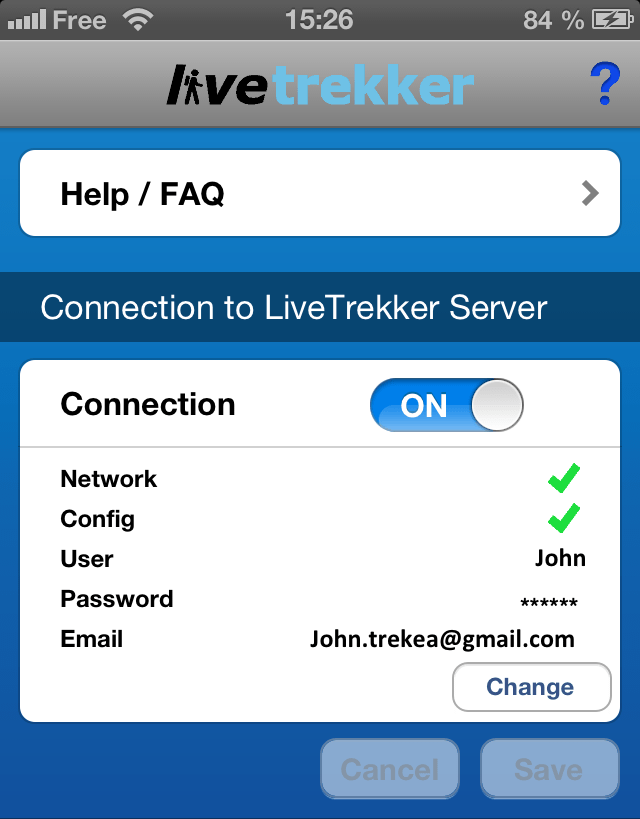
6.1. What does "Connected" On and Off mode mean?
The Connected ON mode allows the Blogs you take and the Trips you define to be uploaded to the Cloud at a given time interval.
Switching your Connection to Off will cut all the connection from your device to the Cloud and your data won't get automatically uploaded anymore.
Don't forget to use disconnected mode when you are abroad to avoid data roaming charges! This also helps to conserve battery life on your device.
No data is acquired from the Internet except for the map and nothing is transmitted to the Cloud.
6.2. What does the different "Map" options means?
- What is the difference between "Map Rotation with Course" vs. "Heading"?
- What does "Zoom Auto" mean?
- What does "Show Heading" mean?
- What does "Compass North" mean?
Map rotation with course rotates the map with the direction you're moving in whereas Map Rotation with Heading rotates the map in the direction of the device.
When Zoom Auto is On the Map will automatically zoom depending on current speed.
If you are not already in "map rotation with heading" mode On, this option will allows you to view your heading shown with a white cone on the map.
You can choose to display headings true north (i.e. geographic north) or magnetic north.
6.3. How do I found some help through the App?
On the support section, you can request some help by contacting us, replay the tutorial screen or view some tutorial videos.
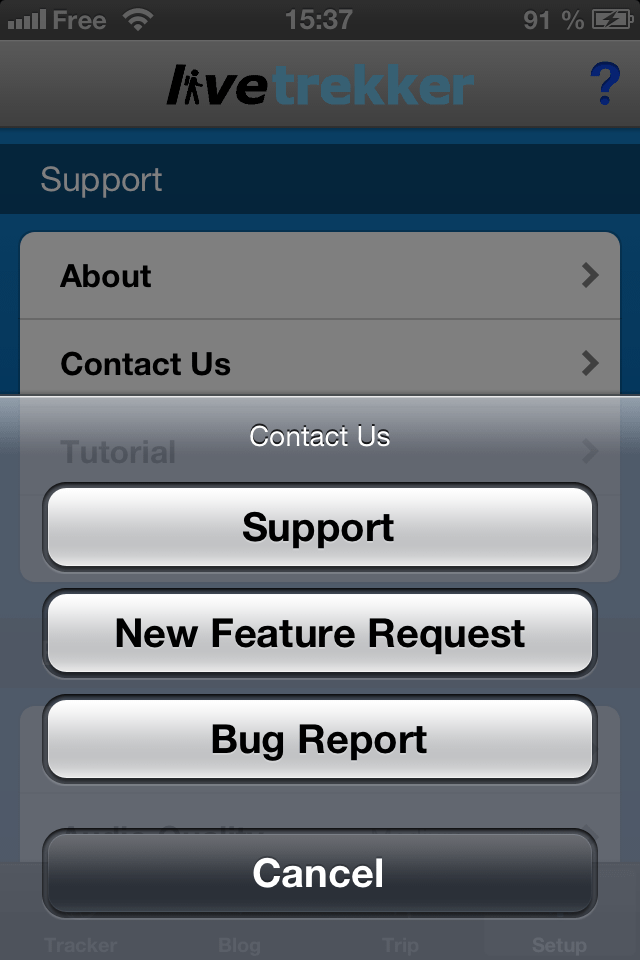
6.4. May I report a problem to someone?
Sure! On the App, select "Contact Us" and select the appropriate topic to reach the right person. A form with some important information is generated and all you need to do is fill in the mail with your message and send it with your email client.
You can also reach us at support@livetrekker.com
We will try to respond to you as soon as possible.
6.5. What can I modify in "Blogs" section?
- Blog quality,
- Blog history,
- Auto save,
- Picture cropping,
Set a default quality for any kind of media. But beware that the higher the quality, the more time it and resources it will take to synchronize with the Cloud.
You can also change a blog quality for the next capture by holding the blog icon in the Blog tray 2 seconds on the Tracker view.
Here you can define how long your data are stored on your phone before being automatically deleted. The maximum is usually 180 days, unless you couldn't synchronize during such a period of time. Selecting a shorter blog History will delete older entries on your device sooner but they are still available on the Cloud without any limitation of time as long as they have been synced.
With "Auto Save Picture" mode On, all the pictures you record on the App will be also available on your phone's library in the Original or Cropped format, according to your choice.
When Picture Cropping is On, all your picture taken via LiveTrekker™ will be squared.
6.6. What can I modify in "GPS acquisition" section?
- Time interval,
- GPS Heuristic,
- Run in Background,
Here you can define the Time Interval, which is how often the GPS gets and updates your location on the map, recording it to the cloud if Connected.
We recommend you to keep the GPS acquisition interval at 5 seconds. A higher interval will decrease your tracking accuracy, and a higher interval will drain your battery at a faster rate.
You can also turn Off GPS Heuristic. GPS on cellphones (and therefore iPhones) are aided by cell tower connections. When the cell phone loses tower connection (i.e. there is no signal), it loses GPS precision immediately and can sometimes appear then to vary widely. This leads to inaccurate GPS reading. We attempt here to smooth this phenomenon. Note: we still have much progress to make!
If run in background is turned on, LiveTrekker™ will continue to acquire your GPS coordinates, even if you switch to using another application.
6.7. What is the Cloud Transmission? Why is it useful?
Here you can define at which frequency your device transmits your trip data to The Cloud.
Tips: Increase the frequency to improve your battery life. But don't forget that if you are sharing your trip in real-time, your trip will be refreshed less often.
6.8. What is the "Ergonomy" option for?
Enable this option to display the Blog recording tray on the left-hand side of the Tracker screen, so that it becomes more easily accessible if you're left-handed.
6.9. What are the "Logging" options for?
The Logging options are useful for us to improve the app or find the reason a bug appears. The more Logging option you select the more the app will slow down.
By default, only errors and connection info are selected.
6.10. How do I prevent the screen from darkening when I acquire positions?
Set sleep mode to enable in the Setup tab.
Note: You may have to turn off the Auto Lock feature in your device iOS Settings but be aware it will not lock up automatically anymore.
6.11. What are the "Anonymous usage statistics" for?
When this option is enabled, we collect strictly anonymous usage statistics to better understand LiveTrekker™ usage and performance characteristics. Bandwidth usage is minimal.
III. The Website
1. Account / Login
1.1. I don't have an account
On LiveTrekker™, you don't need to have an account to view public trips shared for example by your friends or family. An account is only required to record and synchronize trips and data with the app, and access your trip list from the website. Having an account also allows you to share and edit your trips at will from the web, and more!
When you start the app for the first time, you will be given the opportunity to create your account directly from your device.
Tips: For the region selection, make sure to pick the region that matches your area of residence (Europe, Asia, etc.). This will determine which server you save your data to, so picking the right region will ensure optimal speed when consulting your trips.
1.2. Can I create an account through the website?
Yes, this is possible but it won't allow you to create trips until you actually create or log into your account through the app, which allows you to record data.
If you want to create your account through the website, go to "Get Started" panel and scroll down to the "Sign Up" section.
Tips: Always choose your actual area of residence for the region selection.
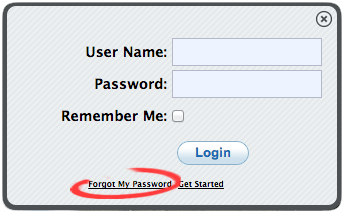
1.3. I have lost my ID or password
If you can't remember your login, just click on "Login" in the header of the homepage then click on "Forgot My Password". You will be redirected to a form where you can ask your password to be reset using your ID or email address.
If you can't remember your ID, you can also enter the email address you provided during subscription to receive an email with your account info.
1.4. How can I change my password?
If you want to change your password, you need to be logged in, then go to your "Account" via the menu in the header.
You can modify your password via a form there.
If you don't remember your current password, you need to ask for another one.
1.5 I want to change my account information like my name or email address.
Once logged in, go to "Account" through the header.
You can define your Name, email address and default language for your data. Your ID and the date of your account creation cannot be changed.
1.6 How can I set my preferences? What are the different options?
Once logged in, go to "Account" through the header and select "Profile".
There, you can set your map preferences, such as zoom settings, displaying the headings arrows or not, etc.
"Hands-Free Mode Options" lets you set your preferences for the Hands-Free Mode, which is a feature specific to trips viewed in real time. When this cool option is turned on, if the shared trip is being synced through the data network, each new blog is displayed then closed without requiring you to use your mouse or keyboard. Sit back and relax while the journey unfolds! :-)
All metrics and units can be modified to better fit your local standards, and much more!
2. Trip list

2.1 How do I navigate in my trip list?
LiveTrekker™ is about recording your travel memories, which are displayed as a timeline in your personal account's trip list.
Your oldest trip is on the far left and your most recent on the right. Use your mouse wheel to scroll left or right. You can also use your left and right keyboard arrows, or simply use those to the left and right of your list.
Pick a specific period of time from the red timeline at the top of the list to easily fast-forward to the corresponding trips of that period, if there is any.
2.2. How do I open a trip?
To open a trip, click on it to select and then click on the "View Trip" button at the bottom of the list.
By default, your most recent trip is selected.
2.3. How can I edit my trip?
Some of your trips' information can be edited: the name of the trip, its start and end dates and its description. You can also give it a ranking, make it part of a group, make it private/public or delete it.
Click on an item directly from the trip list to modify it (and don't forget to save your modifications). To access more options, just open the edit panel at the bottom of the list by clicking on "Edit Trip":
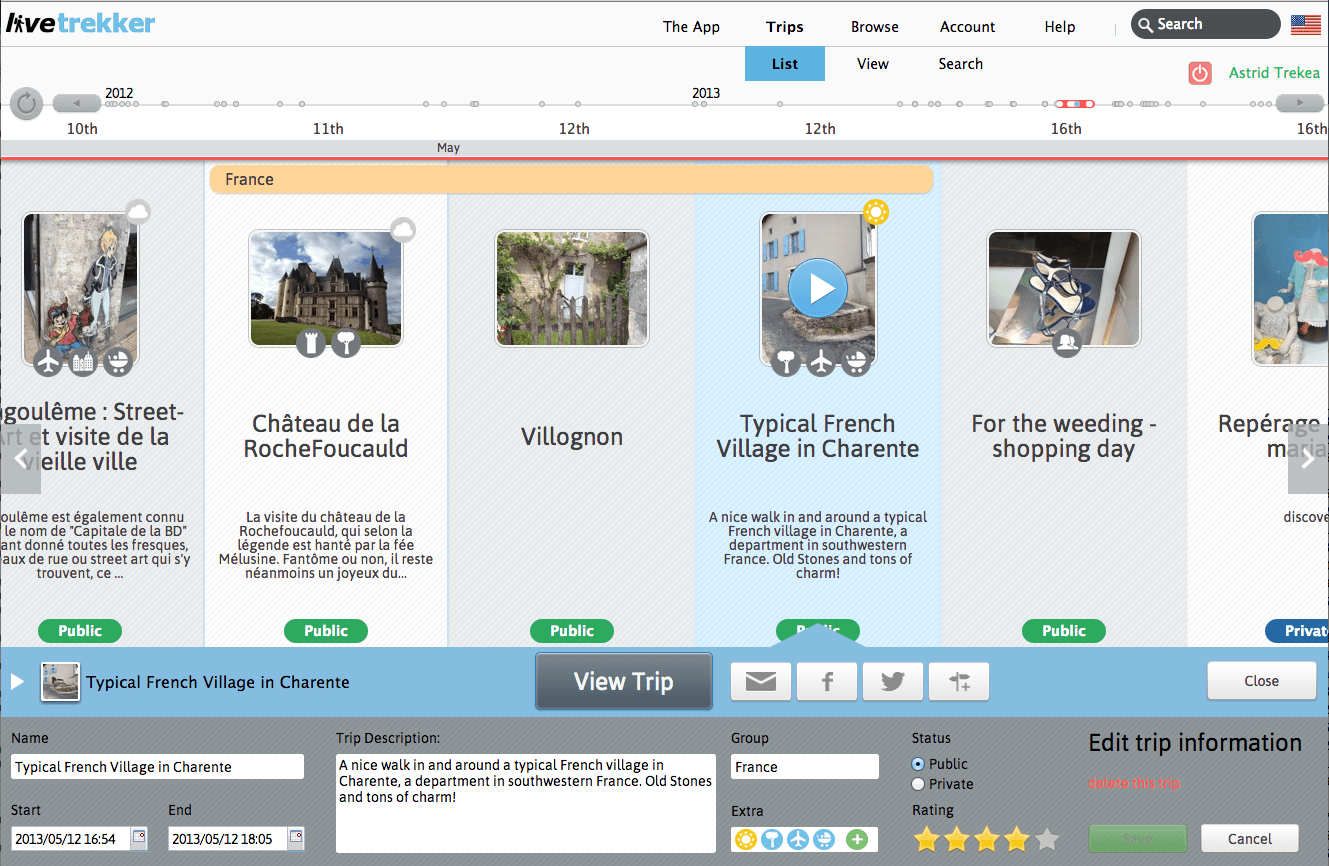
Name: click on the field to rename your trip
Start / end date: redefine the start and/or end dates of a trip to adjust its spanning to the period of time and associated media you want to show.
For instance, if you move the end date from 4PM to 3PM, the last hour of your trip won't be displayed anymore. Note that this won't erase your content from the database and you can restore it anytime by editing the trip again or duplicate it via "Browse", using the same principle.
Trip description: add a description to remember what happened in this particular trip.
Rating: give a ranking to your trip so you can highlight exceptional content on your list. Trips with a higher ranking come as first results when you search through your content using the integrated search engine.
Extra: define one or several categories and weather settings for your trip. You can choose as many as you want, when relevant.
Group: consolidate several of your trips as a single group, to transcribe a particular link between them (part of the same type of activity, or to regroup several trips that belong to the same particular travel spanning several days or weeks, etc.). An orange marker indicates grouped trips on your timeline. Note: your trips have to be next to one another to be grouped.
Public / private: define the privacy settings to allow or restrict public access to a trip.
Save/Clear/ Delete trip: don't forget to save any change you make before leaving. You can also use "Restore" to get back to the initial info you had. If you delete a trip by mistake, you will be able to re-create it through the "Browse" mechanism as stated above.
2.4. How do I delete a trip?
To delete a trip, select it first by clicking on it, then open the edition panel by clicking on the "Edit Trip" button below the list.
On the edition panel that unfolds, you can delete the selected trip by clicking on the "Delete" button.
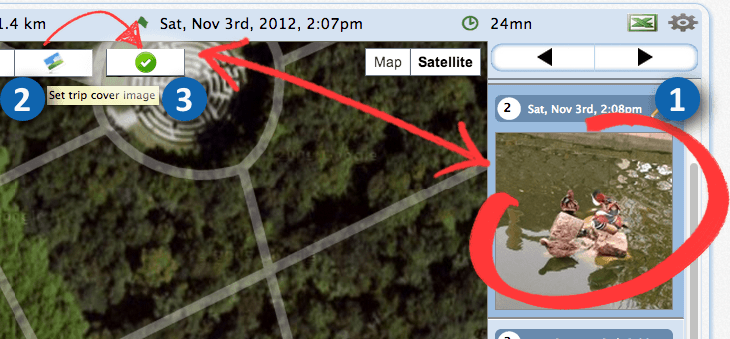
2.5. How can I set/change my cover picture?
To set a cover picture for a trip, you need to open this trip to get to the map view. Then, browse through your blogs in the right-hand explorer and pick the one that you want as a cover picture (1).
Once you have selected a blog (simply click on it), locate the "set cover picture" icon in the top info bar. Click on it (2) and it should turn into a green tick (3) to inform you the cover picture has been set.
2.6. How do I share a trip?
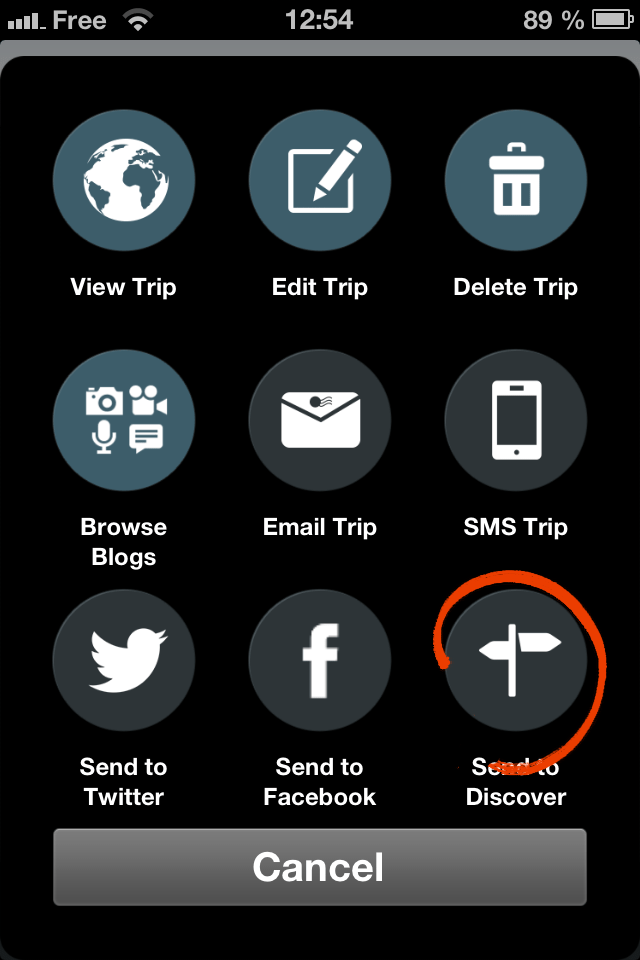
Select a trip from the list and choose the desired sharing option from the row of icons below the list, as following:
![]()
2.7. How can I obtain the short URL of a trip?
To get the short URL of your trip, start sharing it via email by clicking on the corresponding icon from the bottom bar and copy-past the short URL that has been generated. You can also click on the link to use your own email client in the popup that appears. There will be a short URL link in your email.
2.8. Private/ public trip, what does that mean?
A private trip is viewable only by the user and no one else.
If you share a trip, it is set as public automatically, so that you never risk sharing an invalid link. But you can change its privacy settings anytime to make it private (hence, inaccessible) again, even if you had shared it previously. People who had the link simply won't be able to access it anymore.
Tips: If you had previously shared a trip with someone that you want to still be able to access the content you just made private (close friend, family), duplicate said trip you just rendered private via the "Browse" section and share it again to that person only with the newly generated URL.
2.9. May I share a trip with a few people only?
Right now, you cannot specify restricted access to a trip, but this should come soon.
But the good news is that one can access a trip ONLY IF they have knowledge of the short URL, and there are few chances anyone could "guess" one :-). So we simply advise you to be mindful of this when sharing trips with people, in order to make sure you share with only the right persons, and tell them not to broadcast the link on the Internet.
Don't forget that you can make a trip private whenever you want in one click to make it instantly inaccessible.
2.10. Can I make a single blog private?
Right now, you cannot disable a blog in the middle of a trip but you can still reduce the trip length by changing the start and end dates to get rid of the blogs you don't want to share. You can also delete a blog if you don't mind losing it (in the case of blog deletion, be aware that it will be erased forever).
3. Trip view
3.1 How do I navigate on the map?
The map which is displayed on the website has exactly the same behavior you will be used to if you have used Google Maps :-)
Use the standard Google Maps control panel top left on the map to move around or zoom-in / out. You can also click and drag the map with your mouse, and zoom with the wheel. Keyboard arrows are also usable as an option!
Tips: You will also be able to use Google Street View when it is available!
3.2 How do I navigate through the blogs?
Hover a pin to preview the corresponding blog. Click on a blog (either from the pop-up pin preview box or the blog explorer on the right) to open it full-size. You could also use the arrow buttons at the top of the blog explorer (just below the header menu) to swipe through the full-size blogs.
3.3. How do I open a blog and display it in full size?
To open a blog, click on the preview thumbnail or in the blog explorer. You could also use the arrow buttons at the top of the blog explorer.
Tips: Did you notice that photos and videos are in their native format? We do not compress recorded content to ensure that you always have the best resolution.

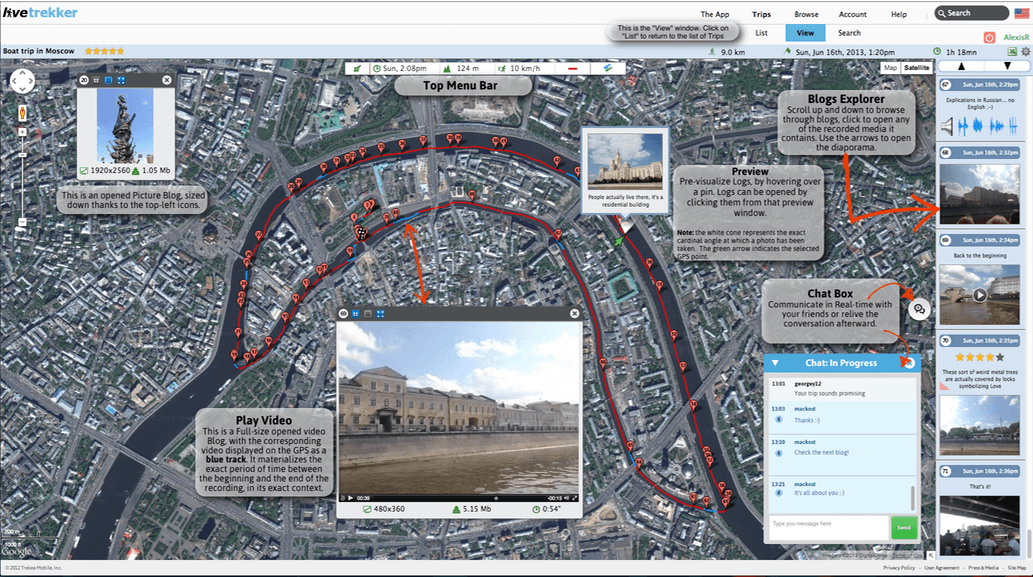
3.4. What is the red line? What about the blue and the yellow ones?
The red line shows your GPS track, i.e. the exact path you've made while recording your trip.
When this line is yellow, it means you have lost GPS signal during this time, so this line represents the connection between the two last valid GPS points.
The blue line shows the distance traveled during a video or audio recording
3.5 What is the white cone?
This cone represents the exact cardinal angle at which a photo has been taken, to ensure a fully detailed rendering of your content.
3.6. What is the excel icon?
Your data is yours, so you need to be able to import it on your computer whenever you want. This icon allows you to upload EVERYTHING via an Excel sheet.
Every GPS point is recorded, and all your blogs are indexed from their thumbnail to the native version.
3.7. What is the wheel icon on the top right of the Blog explorer?
This icon is a link to your settings preference where you can manage map options and units that are used.
3.8. How do I get back to my trip list?
Use the tab mechanism from the menu to get back to your list. You can also use the back button of your browser.

4. Fine-Tune a trip
4.1. How do I remove a blog or a GPS point?
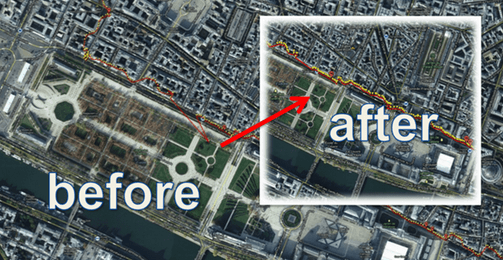
It may happen that you lose GPS signal for a short period of time, which may result in GPS "spike" showing on your path. In that case, you can smooth your path in a few clicks.
Just select the GPS point causing the "spike" and click on the red "minus" icon in the bar element of the map. Your point will be removed.
This will also erase the blog recorded at this exact location, so you can use it to remove an entire blog if you wish.
Tips: If the blog has unfortunately been attached to the spike, don't worry as you can still smooth it. You can simply download the pictures, audio or video file by left clicking on them and saving them to your computer and then add them back into your trip as part of a new blog at their exact location via the edition feature.
4.2. How do I edit a blog or add more media into an existing blog?
Select a blog and click on the pencil icon top right of it in the blog explorer. The blog edit options will appear inside the blog container.
Click on the "+" corresponding to the media you want to add to upload it from your machine. If you want to replace the existing one you first have to delete it with the red trash been icon, and upload the new one.
Tips: Did you notice the pink watermark that appears bottom left on your blog? It means the blog hasn't been done in real-time, or it may have been edited, in order to keep your trips as accurate as possible.

4.3. Can I create a new blog afterward?
When you have selected any point on your GPS track, you can see a green "+" and a red "-" signs on the information bar at the top of the map.
Using the "+" button will create a new blog at this location on the GPS track. Add the media through the blog edit box as usual. Your new blog is now available on the track.
Tips: Notice that you can upload pictures up to 30 MB.

4.4. Can I import a media from another device?
If you have a professional camera or video camera you can upload your media from these directly into your trips by creating a new blog!
Click anywhere on the GPS path (or on a blog) and then click the green "+" on the information bar at the top of the map to create a new blog at this location, then import your pictures or videos.
Tips: In order to easily import a picture in its exact context, refer to the time and date you captured it on your computer's file system or simply save a comment, at the same time you take capture on other devices, using LiveTrekker™ at the desired spot while you are recording the trip. Afterwards you can import your pictures or videos to the same blog thanks to the edition functionality.
4.5. How do I rate a blog?
Select a blog and click on the pencil icon top right of it in the blog explorer. The blog edit box will unfold with a star rating mechanism that allows you to rate a particular blog.
If the blog is rated higher it will be displayed higher up in the search results.

4.6 How do I add a cover picture?
The trip cover will be displayed to identify a trip easily in the trip list of the website as well as the trip list of the app, or even when you share your trip on Facebook.
To define your cover picture, you need to view your desired trip from your trip list, opening the map view. Browse your blogs and choose the one that you prefer as a cover picture. Select this blog by clicking on it on the blog explorer or on the map.
Once selected, you will find the cover picture icon on the information bar at the top of the map. Click on this icon and it will turn green with a tick to inform you the cover picture is selected.
See 2.5. How can I set/change my cover picture?
4.7. May I add several pictures at the same location?
Right now, this is not possible, but you can still upload them close to each other as separate blogs.
Stay tuned for this feature :-)
4.8. Can I geolocalize an entire folder of pictures?
Right now, this is not possible, but you can still upload your best pictures one at the time.
Stay tuned for this feature :-)
4.9. How do I save a particular blog to my computer? And what about my entire trip?
If you want to record a blog in its native size, you can just save it via by a right click on the opened blog and choosing "Save Image As".
If you want to download the full trip, use the Excel icon top right of the map.
5. Search & browse
5.1 What is the "Browse" section? How does it work?
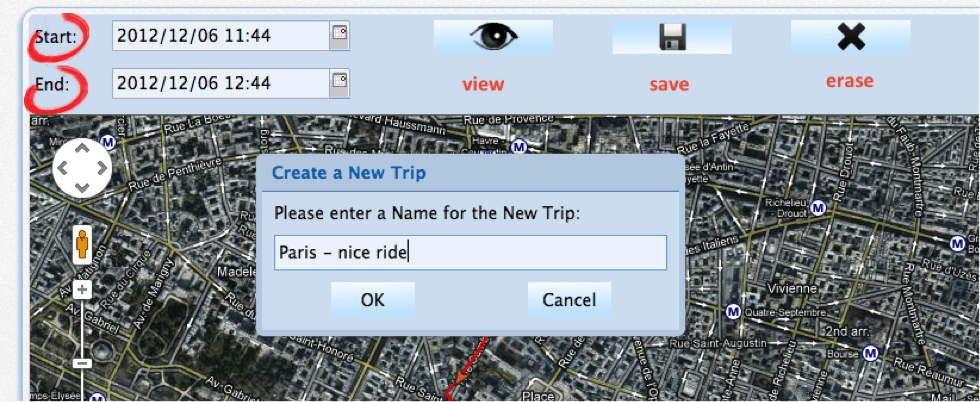
The Browse tab allows you to navigate through all your account data stored in the Cloud.
Your trips are only containers of your data, and everything remains on the Cloud. Therefore if you have lost a trip or simply want to duplicate one with another period of time, you are at the right place!
Enter a start and End date (within the limit of 48 hours) and click on the eye icon. The map with the corresponding data will load below.
Tips: Copy and paste the custom dates of one of your actual trips to duplicate it with other boundaries.
5.2 What is the "search" tab? How does search work?
After using LiveTrekker™ for a while, you will probably realize that you are creating your very own digital memories effortlessly. Very nice, right?
Now, it would be even better if you were able to browse all your data! That's why we offer a powerful search engine to allow you to retrieve any of your data at anytime.
Searching with keywords will give all the trips or blogs containing this word in its title, description or content of the blogs. You can also search according to a specific period of time and even by location. Searching by location returns a true GPS match to geographical areas. For example, you can type "South America" and search for trips in South America, even though you may not have tagged or used the words South America in any of your trips or blogs.
When you have found what you are looking for, just click on the appropriate item in the list to open the full corresponding trip. If you have selected a blog, the corresponding trip will open with the blog highlighted in the blog list on the right of the map.
5.3 Can I do a multi-criteria search?
Sure, for instance, you can search for all the blog containing a specific keyword and/or at a specific period of time and / or at a specific location.
5.4. I can't find my blog through the search function. What is wrong?
If you have no search result for an item you have on your account, it may be because you haven't properly cleared your previous search request.
To do this simply click on "Clear" next to the search icon to reset the criteria, and re-try your search request.
6. I have my personal blog or website
6.1. May I display a trip on my own website?
Yes, we have created a plugin that allows you to share a trip directly on your blog or website, simply by adding a line of code.
You can request this plugin at business@livetrekker.com
6.2. How much it costs?
Please refer to the pricing page.
6.3 How do I get this plugin?
You can request this plugin at business@livetrekker.com and we will send to you the necessary documentation.
Note To use our plugin on your website, your site domain name must first be added to our Google Maps API key. Please be sure to specify this in your email to us :-)
6.4. May I use an iframe?
It is possible to display a trip within an iframe. This is easier to implement and you will not need to register on our API, however this has some limitations. For example, your trip and your blogs will be confined to the size of the iframe, plus the full screen mode will not be possible.
We strongly advice you to use our plugin which gives you more control over the plugins behavior while also allowing your users to display blogs, as well as the map, in full screen mode.
IV. LiveTrekker GO™ for iPad
LiveTrekker GO™ is an iPad app that lets you download trips from the community, your friends and family, or browse your own trips recorded with LiveTrekker on iPhone, wherever you are and with unparalleled detail.
Browse trips from around the world or simply take your memories with you at all times.
- Discover™
Discover on iPad has exactly the same behavior than Discover on the iPhone App. You don't need to have an account to access this tab.
Refer to the Discover part in the App section, to learn how to download, open and parse a trip.
Please note that LiveTrekker GO™ is currently in its first version and will evolve quickly.
Also, please note that you won't be able to geo-localize yourself on a trip if your iPad has no GPS :-)
- My trip
This tab lets you browse your personal trip list, which contains all the trips you have recorded with the iPhone app, hence why you will need to have an account to access it.
At this point you can't share or edit a trip, but this will come soon! :-)
Note: you can't delete a trip from the iPad catalogue for now, but you can delete the data of any downloaded trip from your device to free space. To do so, swipe on any downloaded trip in your list and tap on the red cross.
- Settings and help
Access the Settings by clicking on the wheel icon on the top-right corner of the screen. The question mark next to it will bring you to the help screen.
1. How to browse a trip
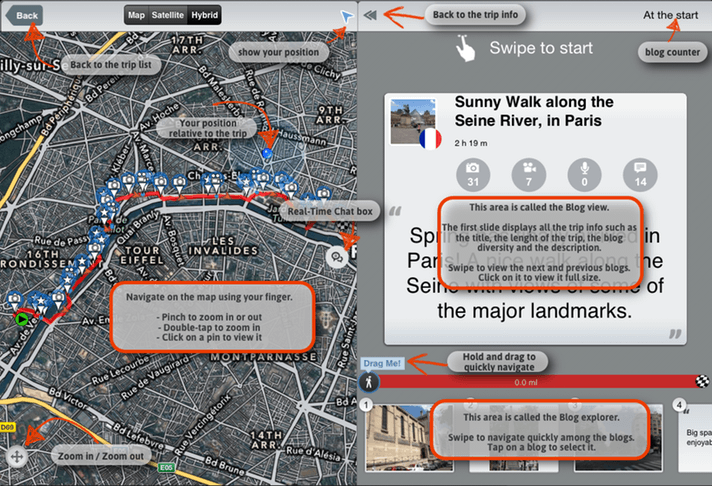
Once a trip is downloaded, you can browse it very instinctively through the 3 main actionable areas on your screen:
-On the left, you will find the map that gives you the context of the trip and the path travelled with pins materializing the position of your blogs on the path.
On the right, it's all about the blogs. The top half is the Blog viewer, where you can view blogs and simply swipe left and right to navigate with a Diaporama feel. Just below is the Blog Explorer to preview and easily navigate through sequences of blogs as a slideshow.
2. May I record a trip with my iPad?
You can't record a trip with LiveTrekker GO™, which is focused around downloading and viewing community and personal trips only.
Nevertheless, it's still technically possible to record a trip with your iPad if you download LiveTrekker iPhone's version and own a GPS-enabled 3G iPad, or find a way to enable GPS acquisition if you don't (with an external GPS device for instance).
Knowing that, you have to be aware that recording a trip with an iPad is not optimal for many reasons, and we don't recommend it. Don't forget that LiveTrekker is available both on iOS and Android ;)
3. Do I need an account to view trips?
You don't need to have an account to download and browse trips submitted by the community on Discover, but one is needed to record trips and sync them with the Cloud, therefore you will need to have one and be logged in to view your trip list.
V. Real-Time Feature
1. What is a Real-Time trip?
A real-time trip is a trip shared while you are still in the process of recording it. That means people are able to follow your GPS path and view all the blogs you take directly on their phone or their Internet browser.
2. How do I share a trip in Real-Time?
To share a trip in real-time, so that your friends can follow your journey and events of interest, you need to start a trip from the Tracker view first, and make sure you have an Internet connection! Returning to the Trip View, you will notice that a new trip has appeared at the top of your Trip list with a green highlight indicating that this is your current trip.
To share it live, you simply need to select this trip, select "Edit Trip" by tapping the associated icon and save it with your desired title, description and group. Notice that the end date is set in the future by an additional 12 hours by default. You can change your ending date, but it needs to be in the future for the live-sharing mode!
Once your trip is saved, the sharing option will be accessible. Share your trip and enjoy your travel knowing your loved ones are following your experience!
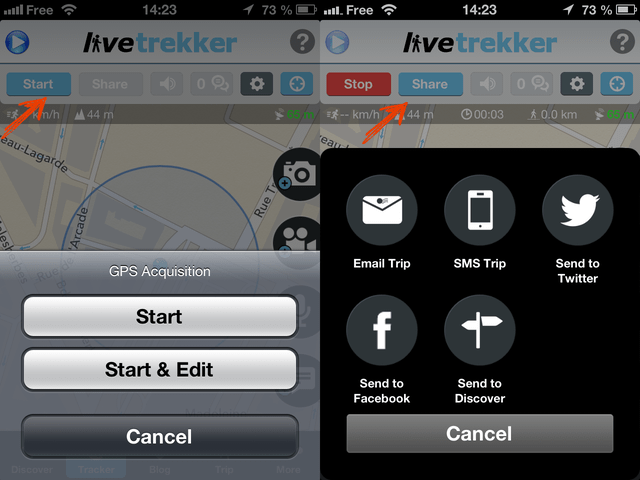
Note: Pressing on the "Start" button for 2 seconds allows you to instantly "Start and Edit" a new trip to facilitate Real-Time sharing. You can also simply use the "Share" button next to "Start" on the Tracker screen,to immediately enable Real-Time sharing.
3. How can people follow me in Real-Time?
To follow you in real-time, your relatives have to open the link via email, SMS or on their favorite social networks.
- If they open it from their mobile:
The trip will be automatically open the LiveTrekker app and be added to the Discover™ tab. This link may open the app store first in order to download LiveTrekker if it is not installed.
A real-time trip appears circled in red on your list, with a Live indicator. The behavior is the same as with any other Discover™ trip, i.e, click on it and wait for the download to start viewing the trip.
Note: this feature is only available on IOS for now. We are working hard to bring this great feature to Android as soon as we possibly can!
- If they open a trip from their browser:
The trip will open automatically in a new window.
Notice a button at the top right. This is the hands-free mode. Click on it and all the blogs will open in full size automatically as they are downloaded. Just relax and enjoy the trip!4. How does the Real-Time chat work?
When you share a real-time trip, everyone who received the link can contact you via the chat mechanism. Connect yourself, pick a nickname and start sharing your thoughts while traveling. Just a note: currently, you can't disable the chat.
As the trip owner, you can access the chat from the tracker tab. All you need to do is tap on the chat bubble icon in the menu to send your messages. You are also able to moderate any of the messages (by swiping it from the phone).
Trip Viewers can access the chat either on their mobile (IOS only for now) or from the web by logging in to their LiveTrekker account.
When the real-time is over, chat messages are still available as a chat log attached to the trip so they can be viewed again later.
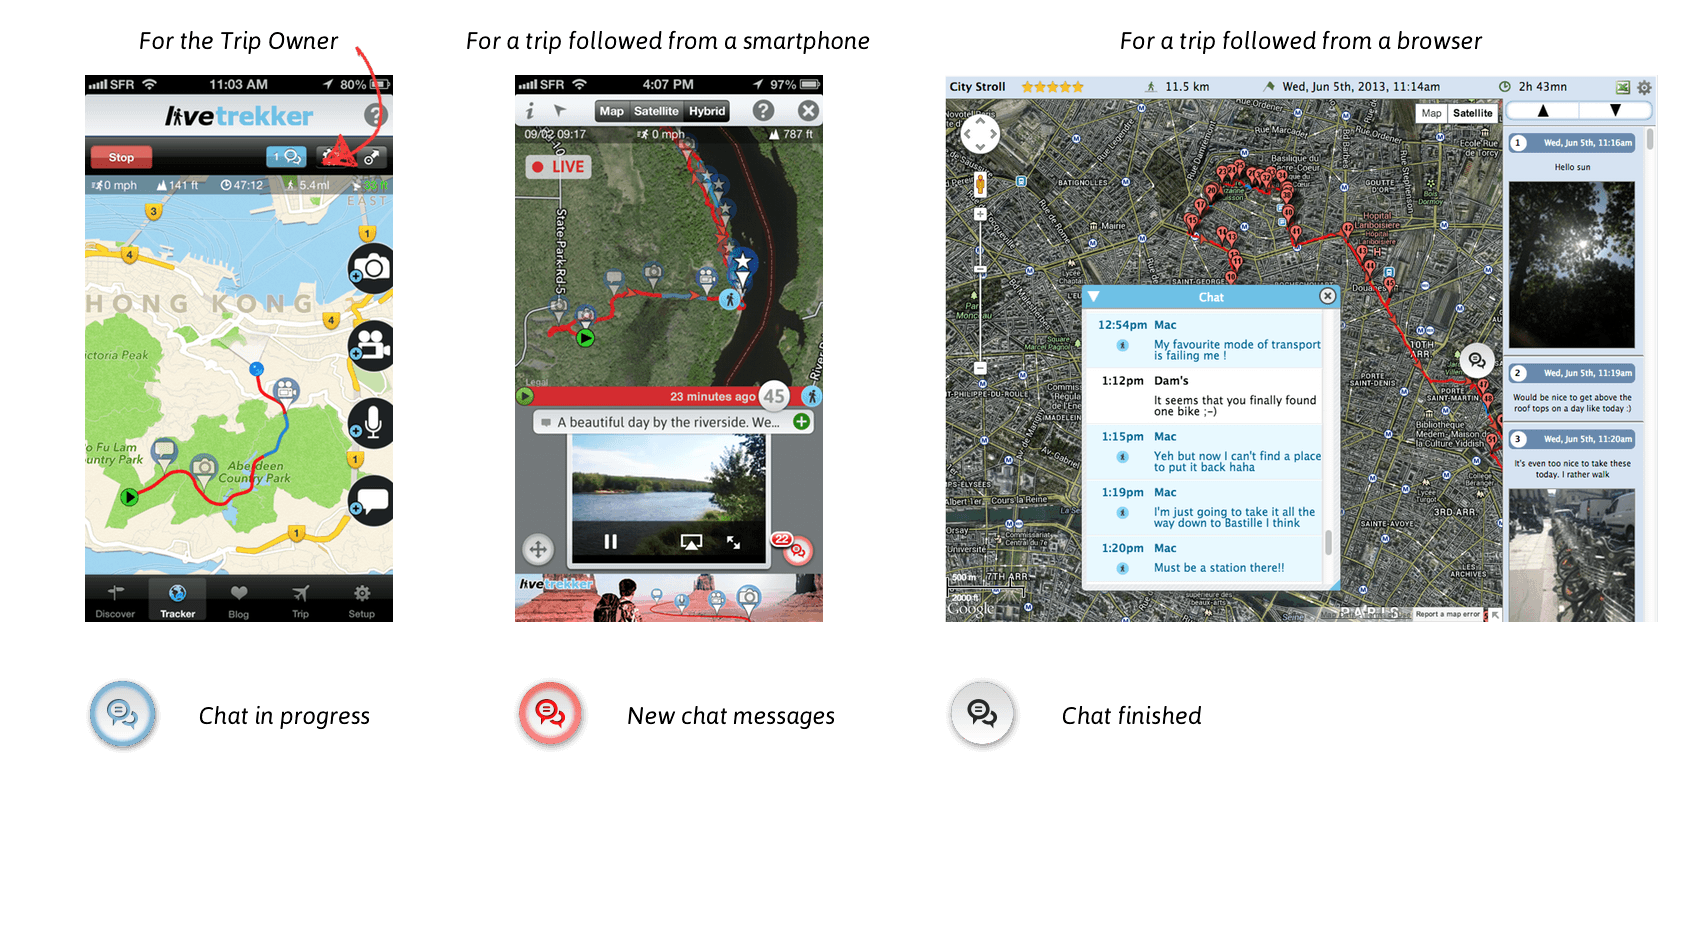
Note:Trip owner's messages are highlighted in blue, other viewers of the trip's messages in white and your own are in yellow.
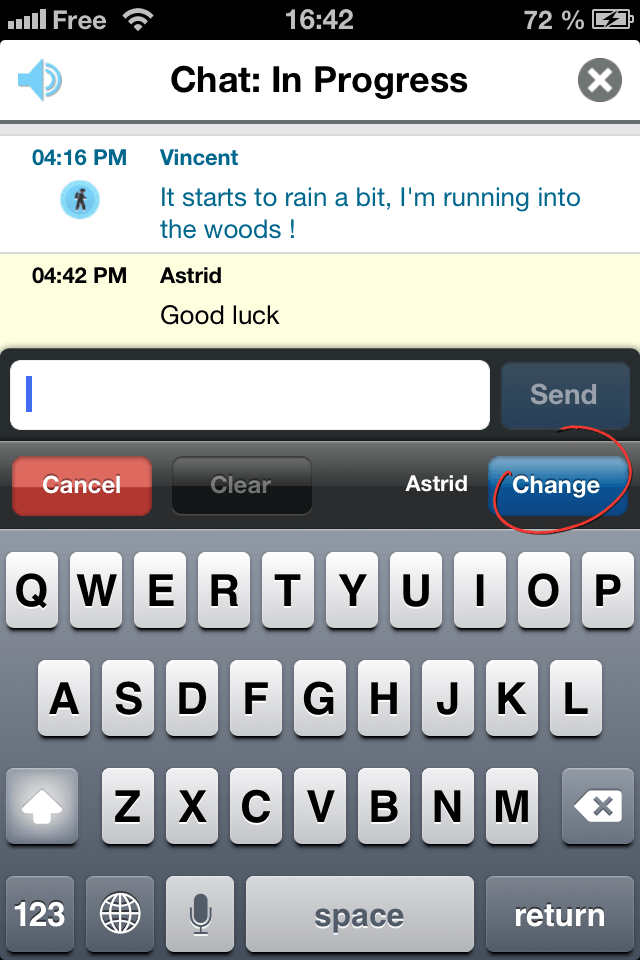
5. How do I set my nickname? Can I change it afterwards?
At your first connection to a chat session, you will be asked to choose a nickname.
If you want to change it later on from the website you can go to the account section of the site and set a new one. Don’t forget to save your modification.
From your phone, it’s even simpler. You can change it directly from the chat window when you started typing a message thanks to a handy button on the top right of the iOS keyboard
6. What happens when a Real-Time trip is finished?
When your trip is finished i.e. you stopped the acquisition or the end date is reached (12 additional hours by default), all the data is still available for anyone who has the link.
The real-time loading bar will disappear as well the hands free mode button, and the blog order will be reversed.
Your trip is now simply like any other trip you recorded in the past ;)
VI. I can't find the answer I'm looking for
If you have a question that is not listed or are in need of more help, please contact us at info@livetrekker.com